How to make the pixel stretch effect on your phone
By Emre Ertunc · Published June 21, 2026 · Updated August 7, 2026 · 6 min read
The pixel stretch effect looks complicated, but the idea behind it is simple: take a slice of color from your photo and pull it across the frame. Here's how to do it on iPhone or Android with Pixel Stretch Pro, plus what makes a stretch actually look good.
How do you make the pixel stretch effect on a phone?
Open a photo in Pixel Stretch Pro, slide the sampling bar over the colors you want to stretch, then drag one of its arrows to pull those colors across the frame. Bend the ribbon with the blue control points, taper the end, and save a high-resolution copy. Four steps, roughly a minute, on iPhone or Android.

If you've scrolled Instagram or TikTok lately, you've seen it: a photo where a band of color peels off the subject and sweeps across the frame. That's the pixel stretch effect (some people call it pixel stretching). It keeps coming back as a trend because it looks handmade, but you no longer need a desktop or a Photoshop tutorial to pull it off. Your phone is enough.
This guide walks through it with Pixel Stretch Pro, a mobile pixel stretch app built specifically for this effect. The same four steps work whether you're making the pixel stretch on iPhone or Android.
What you need
- A photo with a clear subject — a person, a car, an animal, a building.
- Colors that stand out from the background. The bigger the contrast, the stronger the stretch.
- Pixel Stretch Pro on your iPhone or Android phone.
The four steps
Choose the colors
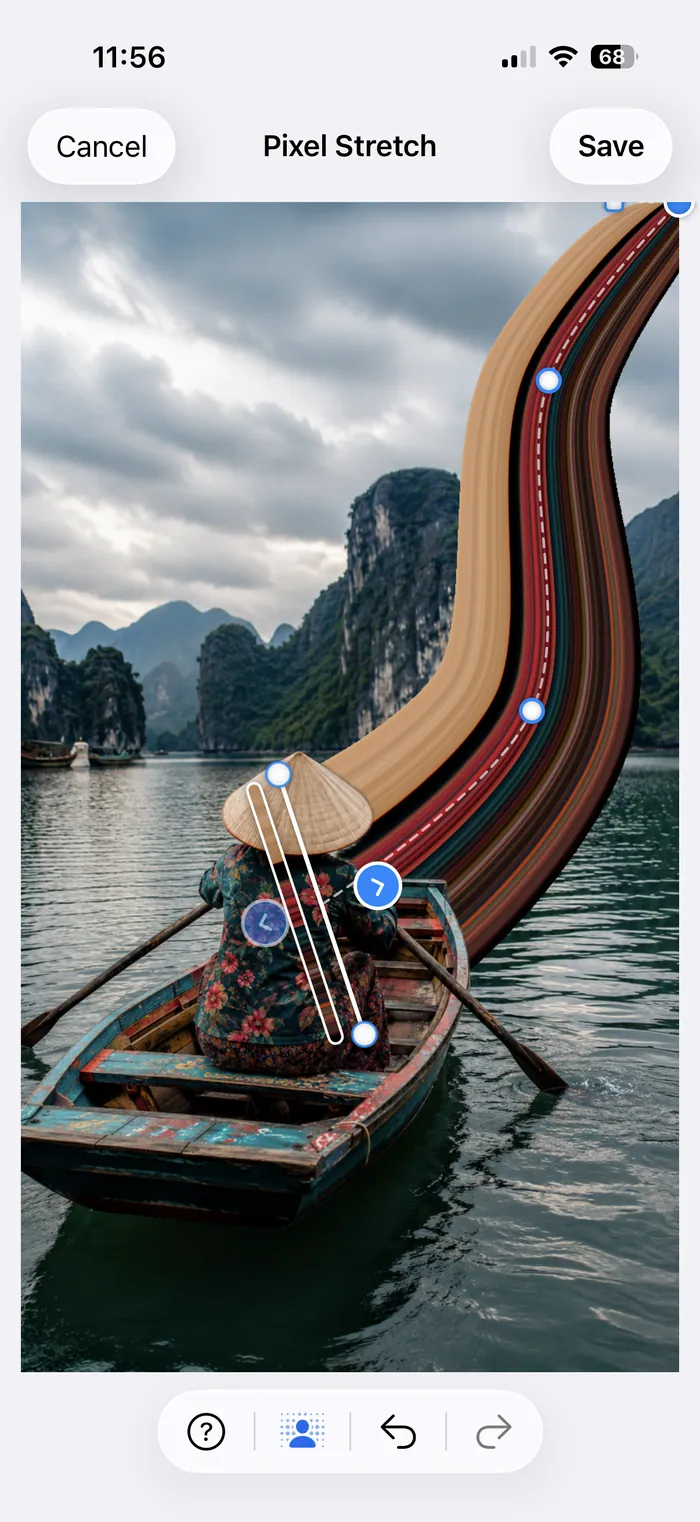
Open your photo and you'll see a thin bar across it. Slide that bar over the colors you want to stretch — say, a bright jacket or a stripe of sunset. Drag the ends to rotate and resize it. A little palette next to the bar shows exactly which colors you've picked up.
Pull the stretch
Each side of the bar has an arrow. Tap one for a clean, straight stretch, or press and drag it to sketch a curving path out across the photo. That first pull creates the ribbon.
Shape the curve
Once the stretch appears, blue control points sit along it. Drag them to bend the ribbon wherever you like. Tap the line to add more points for tighter, S-shaped curves. This is the step that separates a flat stretch from one with real flow.
Refine and save
Use the handles at the tip to fan the ribbon wide or taper it to a fine point, and twist the end for a windblown finish. When available, keep Smart Subject on so the color stays behind your subject. When it looks right, save a high-resolution copy.
Once the basic path feels right, the curved pixel stretch guide shows how Shape, Warp, taper, twist, Edge hue, and Opacity change the ribbon without starting over.
If you want a clean geometric path without placing every point by hand, open Presets after the first pull. Round turns it into an arc or loop; S Curve builds two balanced bends. The Pixel Stretch Presets guide explains how both shapes work.
Tips for a stretch that doesn't look like a mistake
- Start at an edge. Place the bar right where the subject meets the background — that's where the effect reads as motion rather than a smear.
- Pick busy colors. A single flat color stretches into a dull band. A striped jacket, a sunset, or patterned fabric gives the ribbon depth and makes it read far more vibrant.
- Curve, don't just pull. A gentle S-curve almost always looks more intentional than a straight line.
- Check Smart Subject. If it has detected your subject, leave it on so the ribbon stays behind them.
- Less is more. One strong ribbon beats three competing ones.
Not sure what to stretch in the first place? Pixel stretch ideas walks through the subjects that work best, from cars and skiers to skylines and portraits, with an example of each.
How to pixel stretch on iPhone
On iPhone, tap Choose Photo, pick an image from your library, and the editor opens automatically. Everything is touch-based: drag the sampling bar, pull the stretch, then bend the control points until the ribbon follows the photo. When you save, the finished image goes straight to your Photos app as a new copy, so your original is untouched.
How to pixel stretch on Android
On Android the flow is the same: open the app, choose a photo, place the bar, draw and bend the stretch, and export a high-resolution copy to your gallery. Pixel Stretch Pro is available now on Google Play.
Why use an app instead of Photoshop?
You can absolutely make this effect in Photoshop — it takes selections, a duplicated strip, Free Transform, and Warp. It's powerful, but it's slow, and it lives on a desktop. An app turns those same moves into a single curve you can drag with your thumb. If you've never opened Photoshop, you can still make a clean stretch in about a minute. We break down that comparison in Pixel stretch without Photoshop.
Frequently asked
How long does it take to make a pixel stretch?
Once you know the four steps, about a minute. Most of the time goes into choosing which colors to stretch and how far to curve the ribbon.
How do you make a pixel stretch look more vibrant?
Sample colors that already argue with each other. A striped jacket, a livery, or a sunset gives the ribbon variation, while one flat color stretches into a dull band. Start the bar where the subject meets the background, and add a little Edge hue when the ribbon and the backdrop are too close in tone.
Can you pixel stretch a video?
Not in Pixel Stretch Pro. It produces high-resolution still images, and the sense of movement comes from the direction and shape of the color ribbon rather than from animation. If you want a moving version, export the still first and animate it in a video editor.
Is there a pixel stretch filter on Instagram or TikTok?
Neither app has a built-in pixel stretch filter. The edits you see in your feed are made somewhere else and then posted. Pixel Stretch Pro saves the finished image to your camera roll or gallery, and you upload it like any other photo.
What if the stretch goes wrong halfway through?
Undo and redo cover every move in the editor, so you can walk back a bend, a taper, or an entire path without reopening the photo. Compare holds the original on screen, which is the fastest way to tell whether the edit is actually improving the picture.